K&R Chapter 1: Who and Why Is C?
functions · variables · statements · arguments · escape sequence · EOF · character constant · string constant · canonical mode · raw mode · kernel buffer · terminal driver · block · short circuit · function prototype · call by reference · call by value · \0 · automatic variable · extern · definition · declaration · initialization · string · while · prefix and postfix · null statement · pointer
How and why I chose C and K&R
Hey guys 1, I know it’s been a while since my last post on CS:APP, a lot’s happened since then. I’ve been engaged with lots of new learning material, insights, course units and a bit of ups and downs trying to find my footing. So basically, I skimmed through a couple of CS:APP chapters and discovered that some exercises required a good foundation in programming in C. I thought it better to first learn C, and then, once I’m at a comfortable position, continue with CS:APP. I do intend to do all the exercises in the book, so it’s probably for the best to make the experience smoother. I soon settled for K&R, cause why not. I’d like to imagine it’s because I understood the value it provides over similar books, but I honestly chose it because it’s written by the creators of the language and it has a good reputation, at least big enough for me to notice and I’ve seen lots of repos showcasing the exercises for this book. My aim with reading this book is to learn C at a level enough for me to understand its limitations, strengths, and quirks, and to use it to create whatever I want within its limitations. I chose C first because it’s popular in lots of books, so it’ll be a good foundation for all those projects and exercises plus I want to know all the pains that languages like zig and rust try to solve, I’ll probably pivot to C/C++ once I’m comfortable with C then zig, rust, Ocaml and the rest of the bunch. I intend to read the book back to back, complete all the exercises in it, and share my thoughts, interesting experiences, and lessons along the way. I don’t intend to give too much detail about syntax except for a few gotchas, quirks, and uncommon behaviours some people (including me) wouldn’t know, so I can leave more room for sharing my experience. Besides, if you really want to learn the language, I’d advise that reading a blog is probably not enough to get some of the details and experiences the book offers.
As of publishing this blog, I’m currently midway through the fourth chapter, so far it’s been a wild ride.
Solving Problem-solving
When I first started reading the book, I was like, “Okay, what could be so hard? Just read, do exercises, and post.” So I’d planned to post a chapter blog only after completing the exercises of a chapter and feeling satisfied. You can probably guess how that went. Boy, was I wrong.The experience exposed lots of gaps in my programming and problem-solving skills. It’s partly the reason I took so long to finally post again. To give you an idea, here’s how it would typically go. I’d read a section, review the example by pasting and running it, and then take notes on anything that caught my eye. I’d then feel confident enough to proceed to the section exercises and close the book. Now, this is where things got interesting: I’d write a program beginning to end, run it, tweak a little to fix a bug, run it again, then repeat until I had the behaviours I wanted. This was pretty simple for the easier exercises (exercises 1.1–1.12), but I soon learned my approach wasn’t sustainable when I got to more complex programs (exercises 1.13–1.24). The old approach would leave me staring at my code for 30 minutes at a time, losing my train of thought every 3 minutes trying to analyze a block and pinpoint exactly where the problem was. I was basically trying to come up with a program from beginning to end using reasoning in real time. I was disappointed to find out how bad I was at this than I thought; it left me feeling really dumb, and I’d just defer the exercises for a later time when my mind had reset. Then I’d repeat the process and get tuckered out while barely making any progress. Through this process I also tried decomposing the problems into smaller parts on paper, basically breaking each problem into smaller sub-problems like I was taught in school, and then, once I had all the solutions to them on paper, I’d start implementing in code and run. This was able to get me past some exercises, but I soon hit a wall again: I’d write what seemed logically correct from beginning to end, but on running it I would still get bugs and mismatches between what I thought the program was doing and what it was actually doing. That was a frustrating loop to be stuck in to say the least. I thought to myself “I’m following the rules I was taught on how to solve problems , atleast as I remember them from chapter 1 of Problem Solving & Programming Concepts by Maureen Sprankle and Jim Hubbard,(which by the way was the only chapter of the book I read, unfortunately)”
The book details the 6 steps to solve a problem:
- Identify the problem
- Understand the problem
- Identify alternative ways to solve the problem
- Select the best way to solve the problem from the list of alternatives
- List instructions that enable you to solve the problem using a selected solution
- Evaluate the solution
Though mine was a slight twist: decompose, solve sub-problems, combine, and evaluate.
After a bit of trial and error and research, I eventually settled on a solution. Given the debugging headache, I’d take a test-driven approach. So I’d basically use an example and detail the inputs and outputs or say the problem outloud so I understood the it(this was really helpful in demystifying a lot, you’d be surprised how much confusion came from not clarifying this). I’d then split the steps into smaller sections, and after decomposition on paper and ensuring my solution was complete, I’d write down the function prototypes and their definitions basically empty, write something in the main function using the functions in the way I imagined the solution would be presented, then have the whole pipeline connected end to end with barely any actual implementation just to have input and output. I’d then start implementing section by section of each function, as little as necessary to have a more complete version of the pipeline. This helped me find any bugs and assumptions I had about certain behaviours early, before they got buried under further abstractions and implementation. I’d then iterate over this until I had the full program. This felt much easier than the previous approach, but I still struggle with problem decomposition and translating the instructions on paper into actual structures in the program. I still have this challenge, but I hope to find better ways of doing certain things; as of now, I’m still using this approach. Suffice it to say it’s not nearly fast enough to complete exercises in time for the next chapter blog, so I’ll move on to other chapters, moving on to other exercises in each chapter and doing harder exercises of previous chapters in parallel.
There’s quite a lot I learned from doing the exercises, some of which is hard to explain here but just shows up as a mix of intuition, memory, and PTSD from previous debugging sessions as I write other programs. I’ll detail the ones I can remember and those I noted down. Also, sorry if the blog is too long, I’ll try to share as much as possible in as few words as necessary, but there’s only so much I can compress without it getting lossy. If you would prefer I split these chapter blogs into smaller separate blogs, or have a better solution, let me know.
Understanding the requirements for an operation in terms of stored state is quite helpful for solving a problem. For example, if you need a function that counts the number of words in a sentence, you’d need to know what a word is, and then how we know whether we’re in a word or have just finished the end of a word. The book details how to use a variable like “in-word” to know whether you’re in or out of a word. This pattern repeats itself in more complex problems, so I’ve learned to note the bare minimum state information required to solve the problem.
I learned that you can find pretty niche ways of debugging your programs. From what I know so far, all you have to do is find a way to clarify any assumption you may have about your code’s behaviour, this may range from adding printfs to peek at state in different phases of the program, to using a specific value for a variable that covers an edge case. Sometimes I’ve gone as far as to use methods too niche to even remember to give as an example, as long as it helps me understand my program’s behaviour better.
Exercise 1-13 (the histogram)
Let me make all of that concrete with one of the first more challenging exercises I did in this chapter. Exercise 1-13 asks you to print a histogram of the lengths of words in the input. The book warns you upfront that horizontal bars are easy, vertical is “more challenging.” It wasn’t lying.
The horizontal version I got relatively quickly(that means about an hour of racking my brains). After a bit of trial and error, I decided to clean up my appraoch. Before writing any code, I drew a 5×4 grid on paper, labelling rows and columns with indices say 0 to 3, this helped me understand that the output had to be structured within the constraints of a terminal, a terminal only lets you print left to right, top to bottom, so you can’t go back and fill something in later. Once I could see the shape on paper, I could stop worrying about visualizing it in my head and focus on other aspects of the ouput then the code followed: detect words with the IN/OUT state machine from the book, store each word’s length in an array, then for each word print that many #. Done.You can check out the code below or in the repo
// Exercise 1-13. Write a program to print a histogram of the lengths of words
// in its input. It is easy to draw the histogram with the bars horizontal; a
// vertical orientation is more challenging.

#include <stdio.h>
#define IN 1
#define OUT 0

int main() {
  int lengths[1024];
  int index, state, c;
  index = state = 0;
  lengths[index] = 0;

  while ((c = getchar()) != EOF) {
    if (c == ' ' || c == '\t' || c == '\n') {
      state = OUT;
      ++index;
      lengths[index] = 0;
      continue;
    } else if (state == OUT) {
      state = IN;
    }

    lengths[index] += 1;
  }

  for (int i = 0; i <= index; i++) {
    for (int k = 0; k < lengths[i]; k++) {
      printf("#");
    }
    printf("\n");
  }
}
Then I turned the grid vertical, and that’s where it got interesting. At first the concept of having veritcal histograms in terminal knowing its constrains was quite downlintg, and this was followed trial and error. I drew the same kind of grid again, but this time with the bars standing up, and I shaded in the boxes that should be #.
Terminal output
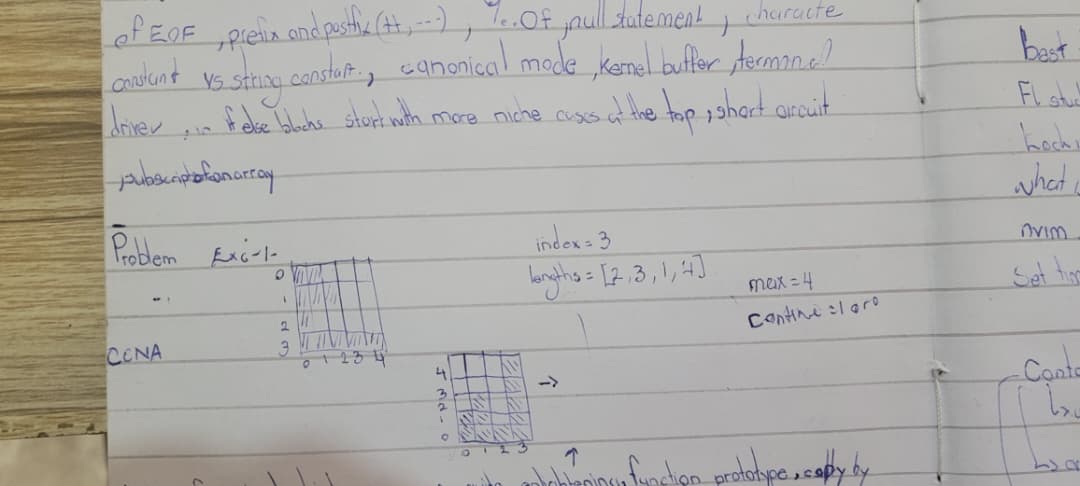
The grid rough sketches that helped. Pardon the chaos
A few things fell out of the picture, one after another. First, the shaded boxes were # but the empty boxes couldn’t just be nothing. Even a blank box above or before a bar had to be printed as a space ' ', because in a terminal you can’t skip a cell and come back to it; every column on a row has to be printed in order. The realization of printing every single cell as either '#' or ' ' was a significant step.
From there the structure fell into place from the drawing. It’s line by line, a repeating pattern per row, so that’s a for loop over the rows. Inside each row there are columns, each one either ' ' or #, so that’s another for loop with an if inside it. But to decide any of that, I needed the structure known before I started printing, so I’d collect and store all the word sizes in an array first (its own step), each index holding one word’s length. And I noticed the height of the grid depended on the longest word, so I had to track that too, before printing a single row.
With that information mapped out, I did exactly what I described earlier: I started from what already worked in the horizontal version and changed it section by section to match what the drawing was telling me, rather than trying to write the vertical version from scratch in one go(not that i didn’t try to like 10 times before).
I’ll be honest that I don’t remember every dead end perfectly, but I’m pretty sure of how I first went at the printing part. If I remember right, my first instinct was to build the histogram layer by layer to derive a separate temporary array for each horizontal slice of the grid, figure out that row’s contents, then print it, and repeat down the layers. There’s actually a fossil of it still commented out in my code: “Print vertical histogram by using temp array derived from lengths for each layer of the vertical histogram.” I think I abandoned it once the drawing showed me I didn’t need to materialize each layer at all, I could just walk from the tallest row down to zero, and for each row and each word, ask a single question: is this word’s bar tall enough to reach this row? If yes, #; if no, ' '. No temp arrays, no per-layer bookkeeping, just a comparison. That was the moment the problem went from fiddly to simple. Heres the code for the vertical version.
// Exercise 1-13. Write a program to print a histogram of the lengths of words
// in its input. It is easy to draw the histogram with the bars horizontal; a
// vertical orientation is more challenging.

#include <stdio.h>
#define IN 1
#define OUT 0

int main() {
  int lengths[1024];
  int index, state, tallest, c;
  index = state = tallest = 0;
  lengths[index] = 0;

  while ((c = getchar()) != EOF) {
    if (c == ' ' || c == '\t' || c == '\n') {
      if (lengths[index] > tallest) {
        tallest = lengths[index];
      }
      state = OUT;
      ++index;
      lengths[index] = 0;
      continue;
    } else if (state == OUT) {
      state = IN;
    }

    lengths[index] += 1;
  }

  // printf("tallest: %d\nindex: %d\n", tallest, index);
  //  Print vertical histogram by using temp array derived from lengths for each
  //  layer of the vertical histogram
  //  for (int i = 0; i < index; i++) {
  //    printf("%d", lengths[i]);
  //  }

  for (int i = tallest; i >= 0; i--) {
    for (int j = 0; j < index; j++) {

      if ((lengths[j] - i) > 0) {
        printf("#");
      } else {
        printf(" ");
      }
    }
    printf("\n");
  }
}
After that, I’d more or less one-shot it. The only real fight left was the classic off-by-one, getting the loops to start and end in exactly the right place so I didn’t print a phantom empty row at the top or drop the last column. Nothing dramatic, just the usual nudging of < versus <= and where the counter starts until the output lined up with the grid I’d drawn. By the way if you find any errors in the code you can let me know via an issue on the exercise repo
The lesson I took from this was that drawing on paper kinda offloaded a lot of cognitive load in the problem solving process, having something to see on paper and then think around and about it rather than doing this while holding the mental modal in you thoughts is a literal mind hack. After visualizing the output, all I had to do was translate what I could see into loops and ifs. The times I struggled most on other exercises were the times I skipped the rough sketches and brain-dumps and tried to solve everything at once in my head. If there’s anything you take away form this blog, this is it.
Gotchas & quirks
Okay, now that you have an idea of what reading the first chapter and doing the exercises was like, let’s get into the details of what I learned. Please note I won’t spend too much time on details that are already available in the book. Again, I highly recommend the book if you want a better understanding. Just an important note: this is the 2nd edition of the book, after the ANSI C standard. All you need is basic C knowledge of the syntax and structures, enough to write a program that takes input from the user and prints output after processing it using certain conditions. But I’ll try to explain anything if I feel the need to.
Okay, so first of all, I knew a bit of C before reading this book, enough to use functions and control structures.I just wasn’t confident that i knew enough enough to start writing larger and more complex programs. Here are some of the quirks and interesting bits: some I already knew, others I learned from the book and exercises.
Types & representation
First is that integers and floats have different sizes depending on the machine, which would explain part of the reason for more explicit sizes like uint32_t from the stdint library, something I learned occurs pretty often while I was doing ESP32 programming in embedded systems this semester (pretty interesting; expect chapter blogs on an embedded systems book soon). In most systems I’ve used, an int is about 32 bits, both signed and unsigned, but the ranges are different, more on that in chapter 2.
C has automatic/implicit type casting, favouring conversion to the larger data type of the available operands. So basically, the answer from adding an int and a float will result in a float, because the choice of casting will be the option that doesn’t involve any data loss (i.e. from small to big type rather than big to small). The type casting occurs before the operation is done.
In C, integer division truncates, basically that means dividing 5 by 2 gives 2. If you wish to avoid this, type cast at least one of the integer operands (5 and 2) to a float; this way implicit typecasting comes in clutch and the result will be a float, 2.5.
I noticed that when defining a variable, say “c”, to hold a character, its type must be big enough to accommodate whatever we intend to store in it, edge cases included. It’s also preferable to use a type whose range of acceptable values is easier for a reader to understand. For example, getchar() returns integers ranging from -1 to 255 (characters are stored as ASCII numbers). We can declare c, which will store values from getchar(), with type signed or unsigned char, both having a size of about 8 bits. Since it must be able to hold EOF (represented as -1) and the character ÿ (represented as 0xFF in hex and 255 in decimal), we prefer to use int: using signed char(ranging from -128 to 127) would mean 255 wraps around and ends up stored as -1, while using unsigned char means we can’t store EOF. So a signed int is probably better, to accommodate the range -1 to 255, which neither signed nor unsigned char can accommodate. It’s nuances like this that can cost you hours of debugging.
Memory, scope & lifetime
Function arguments are call-by-value rather than call-by-reference, except for arrays, which are represented by a pointer to the first element. This is crucial for understanding the effect of your functions on state: if you intend to change a variable external to the function, you should use pointers to the value held by the variable, since just using the variable name will create a copy and you’ll only manipulate the copy. This brings up another point to note: external vs local/automatic variables. Variables defined within a function come into existence only when the function is called and cease to exist when the function returns, because they live in a special region of memory reserved for a function called the stack, which lasts as long as the function’s lifespan (from call to return). A point of clarification to avoid confusion: there’s a difference between definition and declaration. Definition is the place where the variable is created or assigned storage, while declaration refers to places where the value or nature of the variable is stated for the sake of the compiler but no storage is allocated. Assignment just means storing a value in a variable using the assignment operator =. Note that global variables declared outside a function without a definition (e.g. int a;) are initialized to zero by the compiler, while local/automatic variables that aren’t defined are initialized to garbage values, because they’re allocated memory on the stack at run time, whereas the former is given a fixed, permanent memory address. (Global variables aren’t allocated on the heap; the heap is reserved for memory you request manually using malloc, calloc, or realloc.)
The extern keyword is like telling your compiler, “This variable/function already exists, so don’t allocate new memory for it, rather, look for its definition during linking,” compared to just declaring a variable using, say, int variable-name, which reserves space in RAM for that variable. This means you can use a variable defined in other files without worrying about it. They’re pretty common in header files (.h files), allowing your C files to access the same global variable without reallocating space for each file using them. You can also use it to explicitly define a declared global variable within a function, even when the variable isn’t in the existing file.
C standards
It’s worth understanding the difference between different C standards like C89, C90, C95, C99, C11, C17, and C23 to understand certain behaviours,for instance, how function definitions were handled in C89 vs C99. You can find more on this on this wiki page or in the book. Some of the differences affect function definitions and expected return types. For example, C89 implicitly expected int for functions whose return type wasn’t specified in its prototype; this became a problem for functions that returned floats but didn’t declare so, leading to truncation since the values were implicitly cast to int. C99 forces you to be explicit about the return type of your functions. Note that the function prototype tells the compiler what a function looks like (its interface and return values); since the compiler processes your file from top to bottom, prototypes give the compiler crucial information about your functions so they can be used before their definitions, for better readability.
Style & good practice
It’s probably a bad idea to randomly include magic numbers in your code; rather, use #define to create named constants for any values you intend to use in the program that don’t change — for example, use PI instead of 3.14159 whenever it’s needed. It makes your code easier to read, edit, and understand. C is a compiled language rather than interpreted, so all occurrences of the defined macro will be replaced in the preprocessing step of compilation. Learn more about compilation in this CS:APP blog or this wiki.
How does if (a && b) decide not to bother evaluating b? C uses a shortcut called short-circuit evaluation: when evaluating such an expression, it stops as soon as it can. && evaluates left to right and stops the instant it meets a false operand, so if a is false, it won’t bother finding out what b is.
It’s always good practice to declare any assumptions in your code — for example, the expectations on the arguments your function expects, or constraints on variables you expect to be followed for something to work.
The terminal, kernel & C library
While working through input-handling exercises, I got some insights into how the terminal, kernel, and C library behave and interact. One of the first things I learned was the difference between terminal-driver signals and my actual keyboard inputs. When giving input to a C program through the terminal, the terminal usually first stores your input in a buffer, and then, when you press enter (\n), the information is fed in, including the newline ‘\n’ character. Other key bindings like ctrl-D and ctrl-C tell the terminal something different. Ctrl-D tells the terminal driver to signal end-of-input (EOF), so every subsequent getchar() will just read EOF.There were some rather shamefull programs and failures in my appraoches simply cause I didnt understand some rules and had assumptions. Here’s a devastating snippet from one of the programs and probably the worst code snippet you’ll see today:
while (1) {
      c = getchar() != EOF; // will be 1 or 0 due to an operator precedence bug
      printf("%d", c);
      getchar(); // consume the newline character from pressing enter
    }
The above program has more than one bug. First, c = getchar() != EOF will always be a 1 or 0, because the != is evaluated first, before the assignment. Second, there’s simply no way out of the loop — no break statement and no condition to allow for an exit; at the time, I imagined that ctrl-D would magically stop the loop. A better version would be:
#include <stdio.h>

int main() {

  int c;
  while ((c = getchar()) != EOF) {
    if (c == '\n')
      ;
    else {

      printf("%d\n", c);
    }
  }
}
This way the loop can end on encountering the end-of-input signal, and it also handles ‘\n’ better, so that it’s simply ignored instead of its value being printed as well. Once I enter a set of characters, say ‘abc’, into the terminal, the program hasn’t read even a single value yet. The values are stored in a buffer which is only given to the program once I press enter. The loop then cycles through the list of characters, i.e. ‘a’, ‘b’, ‘c’, and ‘\n’, printing out the value of each on its own line. The terminal can also be configured to avoid using a buffer. The buffered default is what you also know as canonical/cooked mode; the other mode, which sends each input directly to the program immediately, is known as raw mode. You can use the stty command to enable or disable it, for example, stty -icanon disables cooked/canonical mode while stty icanon enables it. There are other behaviours to configure too. You can read more about this here.
In exercise 1-10, I switched to reading keys more directly using raw mode, and backspace stopped behaving. It turned out the Backspace key doesn’t send ASCII 8 (BS) on my setup; instead it sends ASCII 127, which is DEL. And the terminal echoes DEL back as ^?, its caret-notation spelling (control characters are displayed as ^ plus a symbol; DEL maps to ^?).
I could silence that echo with stty -echo, but then everything I typed would become invisible, leaving me stranded unless I can type stty echo without seeing the input. I’d then have to explicitly manage what I allow the terminal to display, so more control = no defaults = more code and logic to handle. It’s easy to spiral down this rabbit hole in pursuit of control until you learn the reason for abstractions. I try to use abstractions sparingly usually untill I’m comfortable with the balance between control and the amount of logic I’ll have to handle.
The End
Thanks for making it to the end. I know it’s kinda long, but I hope you’ve gained something from my experiences and lessons from the chapter. Again, if you’re interested in really learning C, I highly recommednd that you pick up the book, read it, and do the exercises, there’s so much I learned from the exercises and googling that I haven’t mentioned here due to time and space. Feel free to use the keywords underneath the title to find your next rabbit hole. That’s it for now, go do stuff.